Unused Colour Challenge

So, yesterday I was at my upline Mikaela Titheridge’s (http://thecraftyoinkpen.blogspot.co.uk/) house with fellow team member Susan Merrey (http://craftyduckydoodah.blogspot.co.uk/) and the conversation got around to what are our least used Stampin Up! colours. It turns out we all had 3 or 4 colours that we rarely, if ever use. It is just so easy to reach for your favourite colours and colour combinations when designing a project.

The upshot of the conversation is that Mikaela has challenged the team to name our 4 least used colours and to design a project using at least 3 of them. Got to say I love a challenge…….. so, here goes….

1-DSCF7531

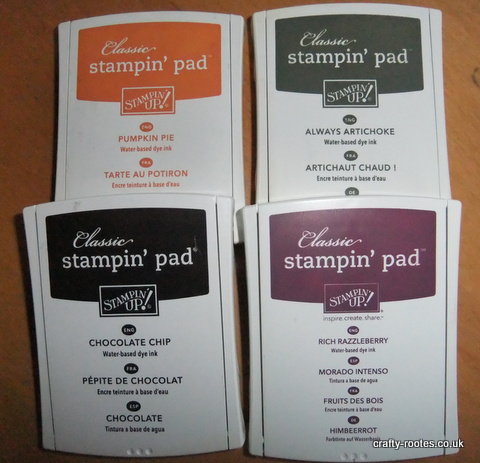
Stampin Up! inkpads

My least used colours are Chocolate Chip (there were cries of horror from Susan when I announced this one), Always Artichoke, Rich Razzleberry, I like the colour but can never seem to combine it successfully with anything else.  And lastly, Pumpkin Pie, I struggle with oranges in general and could just as easily have picked Tangerine Tango or Tangelo Twist, except, I don’t have either of those … says it all really.

My first thought was to use the Gorgeous Grunge stamp set, but on reflection I thought this was a bit of a cop out. I decided I would up the anti by also choosing to use Very Vanilla cardstock and the Happy Patterns stencil pack. I have used both the cardstock and the stencils twice since I bought them and I thought they might work with this colour combo. I also decided to use all 4 of the colours I had selected for the challenge.

1-DSCF7525

I got out some sponge daubers, chose the dotted line stencil pattern and set too. I decided to use a sentiment from the Perfect Pairings stamp set, one of the Sale-A-Bration options which I have not yet used and the Lots of Labels dies, again, I bought these a while ago and haven’t used them. I was so happy with the result; bizarrely the colours seemed to work well together and gave the card quite a masculine look. I added a small amount of the Metallic Gold Thread and some Candy Dots to give the card a bit of texture and called it done.

1-DSCF7526

I decided to try another stencil from the same pack, there are 4 altogether. The sentiment is from Perfect Pairings and I added a small piece of Gold Glitter Tape, another Sale-A-Bration option and used the Banner triple Punch to flag the end of the sentiment.

1-DSCF7528

I have to say, I really like both of the cards and all of the colours I used. What a revelation. I also loved the stencils which were so quick and easy to use.

1-DSCF7529

Hope you like the projects and maybe you could try the challenge for yourself. Let me know how you get on.

Don’t forget Sale-A-Bration ends on the 31St March, so if you would like the Perfect Pairings stamp set or the Glitter tape, or indeed any of the other items go to my online shop at http://www.stampinup.net/esuite/home/crafty-rootes and hit the ‘shop now’ button. You can pick one free item for every £45 you spend.

Looking forward to seeing you again.

Mo x

Rose Garden another way …… Notecards

I made the cutest set of notelets today using the lovely Rose Garden framelit dies. I have used these dies before to die cut the fantastic, huge rose and smaller rose. I have also used the pretty little sentiment frame from the set but the little leafy branch has, until now, passed me by. No longer…….

I saw a Youtube video earlier this week by Mary Fish – www.stampinpretty.com – using the leafy branch die. So I got out the Rose garden Framelits and set about CASEing the card.

I started by die cutting the leafy branch from a panels of Rose Red cardstock and Pink Pirouette cardstock. I then inserted the Rose Red die cut into the negative space cut in the Pink Pirouette panel and the Pink Pirouette die cut into the negative space in the Rose Red panel. I backed both pieces onto Whisper White cardstock. I love the way white shows through, so pretty. This panel was mounted onto a piece of either Rose Red or Pink Pirouette cardstock and added to a Whisper White Notecard. Prior to matting and layering I decided to corner round opposite corners of all the pieces to add some interest.

The sentiment comes from the Birthday Blooms stamp set and was punched out using the Large Oval Punch. I added a flower in either Rose Red or Pink Pirouette using the flower punch from the Itty Bitty Accents punch pack. Each flower has a candy dot in the centre.

1-DSCF7502

I was really happy with the way these cards turned out and decided to try some other colours. The second pair of cards are in Lost Lagoon and Soft Sky. The third set are in Pear Pizzaz and Mossy Meadow and I love them all. I think they look great.

1-DSCF7504

I want to gift this set to a friend so made a simple box using Thick Whisper White cardstock. The panel on the top is in Pacific Point and Tempting Turquoise, another great colour combo.

1-DSCF7505

I am really happy with these notecards and box and love all the colour combinations. Hope you do too.

Looking forward to seeing you again.

Mo x
Botanical Blooms stamp set and Botanical Builder Framelits for a special card

Botanical Blooms stamp set and Botanical Builder Framelits for a special card

At last, after nearly 3 weeks of illness I am back in the craft room – whoop whoop – and just in time to make a special card for my youngest Aunt who turns 70 on Saturday.

1-DSCF7402I got out the Botanical Blooms stamp set and the co-ordinating Botanical Builder Framelit dies and a selection of cardstock from the subtles family and spent a happy hour die cutting flowers and leaves. I love that you can stamp the die cuts to add texture to the shapes.

I used So Saffron, Wisteria Wonder, Soft Sky, Pink Pirouette, Wild Wasabi and Basic Grey cardstock and layered up the flowers with the different colours to give dimension. I also inked the edges of the flowers using co-ordinating inks and a sponge dauber to add some depth to the cardstock.

1-DSCF7404

I used Thick Whisper White cardstock to make a 5½” square card and stamped the sentiment ‘Look Who’s Turning ‘ – from the Number of Years stamp set, in Basic Grey ink at the top of the card on the right hand side. I then stamped the 7 and the 0 with the same colour ink onto Whisper White cardstock and die cut the numbers using the co-ordinating Large Number Framelit Dies and added them to the card front with dimensionals.

1-DSCF7403I then arranged the leaves and flowers around the numbers and sentiment. I stamped the dotted stamp with Wild Wasabi ink around the die cut flowers to add some more texture and added some basic rhinestones for some bling. I then made an envelope using the Envelope Punch Board and a piece of dsp from the Wildflower Fields stack. This is one of the Sale-A-Bration items you can choose for free with a £45 order.

I am really happy with the card and I really hope my Aunt likes it

Thank you for stopping by my blog today and I hope to see you again soon.

Mo x

Something for Baby – Faux Resist

The daughter of an old friend is expecting a baby soon and I was playing with ideas for a baby card for her and her partner.

I pulled out the Something for Baby stamp set and co-ordinating Baby’s First dies. I just love the onesie stamp from this set and the matching framelit, such a simple design but it looks so effective and can be used for both sexes.

I wanted to try a technique called faux resist which I saw on YouTube demonstrated by Dena Rekow https://www.youtube.com/watch?v=pMS-IRUhiWg

I mounted the flower and heart stamps from the set together on the same acrylic block, then stamped them over the upper ⅔’s of a layer of Whisper White cardstock using Whisper White Craft ink. I then stamped the onesie in Blackberry Bliss ink in the centre of the white stamped area. It looked like a smeared mess but as it dried the Whisper White craft ink began to show through the Blackberry Bliss like a shadow. Such a cool effect.

I stamped the sentiment from the Sky is the Limit stamp set in Blackberry Bliss ink at the bottom of the card layer and used the Curvy Corner Trio Punch to decorate the 4 corner. I then die cut the stamped onesie from the stamped white layer.

1-DSCF7367-001

This layer was then adhered to a piece of Blackberry Bliss cardstock ¼” bigger to provide a narrow frame. The die cut onesie was lifted up on dimensionals and slightly offset to show the Blackberry Bliss layer underneath. I then added the whole piece to a Thick Whisper White card base

1-DSCF7369-001

I also tried this technique with other colours and found that it worked best with a darker or richer toned ink.

Thanks for stopping by my blog today. See you again

Mo x

Bloomin’ Love unmasked

I have been playing with the Bloomin’ Love stamp set and the masking technique today.

I don’t know about you but what drew me to this stamp set was the delicate lacy heart image which mimics the gorgeous Bloomin’ Heart die. However, I found myself using the 4 individual flower stamps included in the set. I love masking off areas of card when using these small stamps, you can get some really cool effects.

1-DSCF7262-001

For the first card I masked off a diagonal strip with low tack masking tape and stamped the flowers in Crushed Curry, Melon Mambo, Night of Navy and Mint Macaron ink. I deliberately stamped the flowers close together and onto the masking tape to create this effect. After I removed the masking tape I added a strip of Night of Navy cardstock to help focus the eyes in on the pattern. The sentiment came from the Balloon Celebration stamp set and is stamped in Melon Mambo ink. Finally, I added some of the It’s My party Enamel Dots from the new Occasions catalogue.

1-DSCF7264

I was hooked on this technique and used it again when I cut a wedge from a layer of Whisper White cardstock. This time I stamped the flowers in one of my favorite color combos Bermuda Bay, Pear Pizzazz and Night of Navy ink. When I stood back and looked at the stamped piece I felt it was missing something and after some thought, stamped the small open heart image, from the same stamp set in Calypso Coral ink. I really liked the result. I mounted the pieces onto a Bermuda Bay card base and added die cut flowers in Calypso Coral and Bermuda Bay at the apex of the triangle. I stamped the sentiment from the Balloon Celebration stamp set in Bermuda Bay ink. For some extra dimension I added Basic Pearls to the center of some of the flowers

I really enjoyed working with this set, such fun. Thank you for visiting my Blog today, come again soon.

Mo x

Bloomin Heart and Bloomin Love

Bloomin Heart and Bloomin Love

Love is in the air and it’s never too early to think about Valentine’s Day, now less than a month away…eek.

With this is mind I thought I would try the Bloomin Heart Die from the new Occasions catalogue and I have to say I love, love, love it. This die is absolutely gorgeous, so delicate and detailed but having watched a few YouTube videos and read some blogs I knew it could be tricky to get a good cut.


With this in mind I had a couple of trial runs using different cardstock and BigShot sandwiches.

For the first run I used the BigShot sandwich as recommended by Stampin Up! – the multipurpose Platform (no tabs) + Precision Plate, cardstock, die and finally an acrylic plate. I found I needed to run the die through the BigShot 5 or 6 times to get a good cut.

For comparison I also tried the Magnetic Platform + the Precision Plate, card, die and acrylic plate and needed to run this sandwich through the BigShot a couple of times to get a good cut if I was using Foiled cardstock or Glimmer cardstock. This was the option I then used to make my cards but as every machine is calibrated slightly differently I suggest you have a play with your own BigShot to determine what works with your machine.

1-DSCF7256

For the first card I die cut the intricate heart from Red Foil cardstock, so shiny and decadent looking. I then die cut the heart from a panel of Whisper White cardstock, popped out all the pieces to create a frame and backed the hole with a piece of Window Sheet. I slotted the Red Foil die cut into the frame and adhered it to the Window Sheet with tiny dots of Tombow adhesive.

I decided to keep the card fairly simple and added a strip of Real Red satin ribbon below the die cut heart. The sentiment is from the co-ordinating Bloomin Love stamp set and is stamped with Real Red ink and framed by the banner stamped in Basic Black Archival ink. The banner was then die cut using the co-ordinating die from the Large Numbers Framelit dies. I think this is such a classy looking card.

1-DSCF7258

The second card I made has a softer look. I started with a card base in Pool Party cardstock and die cut the heart from Whisper White cardstock adding the smaller die cut flowers stamped in either Pool Party or Real Red. At this point I decided to turn the card on its side to make a landscape card.

I adhered the die cut heart to the right side of the card adding a piece of Blushing Bride cardstock with a flagged end cut using the Banner Triple Punch. Using the smaller flower stamps from the Bloomin Love stamp set, I created a background piece by stamping the flowers in Pool Party, Blushing Bride and Real Red and punching a banner end. I loved the look of this piece; it really tied all the colours together. I added a piece of the lovely, sparkly Pool Party Glitter Ribbon and some Basic Rhinestones to finish the card off.

I am really loving this set and hope you do too.

Mo x

Rose Wonder and Rose Garden Class

Rose Wonder and Rose Garden Class

Thank you to all the ladies who came to my classes this week. I really enjoyed your company, the chat and the laughs and thankfully you seem to  enjoy making the projects using the beautiful Rose Wonder stamp set and Rose Garden thinlit dies. Happy days…….

These are the projects we made:

1-DSCF7203

The first card we made using a Thick Whisper White card base and a layer of Blackberry Bliss card. We stamped the large rose and the sentiment with Versamark Ink and then heat embossed the image using Gold Embossing Power. The card would look amazing if you left it just as it is but when I was designing the class I decided to take it a step further.

The ladies were a bit surprised when I brought out a bottle of household bleach and handed paintbrushes round but they, like me loved the effect bleach had on the Blackberry Bliss cardstock, it turns a creamy gold colour, so pretty. You do need to apply the bleach very thinly, remember you can always go back and apply more. The embossed piece was then adhered to the card base using dimensional tape.

1-DSCF7204

The second card involved some paper piecing which I loved. We stamped the large rose image with Garden Green ink on Whisper White cardstock then glued the outline of the die cut rose on top of the stamped green rose. I die cut all the roses from Blackberry Bliss or Melon Mambo cardstock ahead of time; it would have taken too long for everyone to do this in the class. The ladies were given either a Blackberry Bliss outline for the rose with Melon Mambo petal pieces or vice versa. They then had the fun of fitting all the pieces together…….. The sentiment was then stamped in Melon Mambo and the stamped piece mounted onto a Melon Mambo or Blackberry Bliss card base.

1-DSCF7205

For the final project we used the Gift Bag Punch Board to make a small bag using Thick Whisper White cardstock. We die cut the smaller rose in the front of the bag and backed the hole with a piece of Window Sheet. We then die cut the small rose from Blackberry Bliss and used the outline to inlay in front of the window, adhering it with tiny dots of Tombow adhesive. The top of the box was tied with thick Blackberry Bliss twine (retired) with a piece of Gold Sequin Trim to add a bit of sparkle. Some of the loose sequins were added as you can never have too much bling.

We really enjoyed putting these projects together. I hope you like them and check back soon to see other projects I have been working on.

Mo x

Birthday Blooms in the Spotlight

I have finally had a day to myself to play with my new goodies and I chose to start with the gorgeous Birthday Blooms stamp set.

I loved the delicate look of the rose, it resembles the briar roses that grow in the hedgerows around our house and in the village.

I chose to stamp the rose in Basic Grey Archival Ink for a softer look and used the Shimmery White cardstock as I planned to do some water colouring with an Aqua Painter. To add interest I decided to try the spotlight technique and using a  1¾” punch cut a  circle out of the stamped image making sure to include part of the rose with some of the leaves.

1-DSCF7249

Birthday Blooms Spotlight

I water coloured the rose using a base coat of Blushing Bride  adding shadows using Calypso Coral and Watermelon Wonder. The base coat on the leaves is Pear Pizzazz with Wild Wasabi to add depth.

Prior to matting the stamped piece onto a layer of Pear Pizzazz cardstock I punched the upper right corner with the Curvy Corner Trio Punch to add some interest. I also stamped the sentiment from the same set in Pear Pizzazz Ink in the lower right corner. Using Stampin dimensionals I added the water coloured circle to the card front and adhered the whole piece to a Watermelon Wonder card base. I used Watermelon Wonder ink and the small dotted stamp to tie in the background rose with the card base.

1-DSCF7250

Birthday Blooms

I really love this card; it is soooooo pretty and feminine. Can’t wait to try it in other colours, I am thinking Wisteria Wonder, Perfect Plum and Elegant Eggplant or maybe So Saffron, Daffodil Delight and Hello Honey.

Let me know what you think?

Looking forward to trying out the Bloomin Love Stamp set and the Bloomin Heart die. Drop in soon to see what I come up with

Mo x

Cutie Pie Christmas Trees

I know Christmas has now been and gone but I couldn’t resist using the Cutie Pie die to make 2 more Christmas Tree themed boxes for the ladies craft group.

The first box is made using the Cutie Pie Die set and Lost Lagoon cardstock. I also die cut the triangle from the same set of dies from Night of Navy cardstock and adhered this to the front of the box with Tombow liquid adhesive.

1-DSCF7247

A tree from the Peaceful Pines stamp set was stamped in Mint Macaron ink and die cut using the co-ordinating Perfect Pines Framelit dies. I mounted the die cut tree on Stampin Dimensionals, offset to the right, on the box front. To hold the box closed, I wrapped Gold Cording Trim around 4 times and tied in a bow. The cording trim, both gold and silver are retiring on the 4th January so get them in my online shop while you still can.

1-DSCF7240

The second box is very simple but effect. The die is cut from Garden Green cardstock and embellished using the Real Red and Very Vanilla Enamel Dots from the Home for Christmas suite which retires on the 4th January 2016, so if you like them go to my online shop and get them before they are gone. I used the ¼” Hand Held Punch to punch some circles from Gold Glimmer cardstock to give a little bling to the box. The box is topped by a Gold Glimmer star which was die cut using the smallest of Stars Framelits.

I just love using this die set for Christmas projects and can’t wait to try some summer cake box ideas out in the coming months.

I am looking forward to a bit more normality over the next few weeks and wish Happy New Year to everyone kind enough to visit this blog and many happy hours crafting.

Mo x

New Year Irresistible cards

Well, Christmas is over and the New Year is rapidly approaching. This year a group of us are gathering at a friend’s house to see in the New Year with a pot luck supper. Even better, we all live in the village so no one needs to drive. Happy Days…

To mark the occasion I decided to make each couple a New Year card.

1-DSCF7243

In my stash, I found some Irresistibly Yours dsp from the 2015, Sale-a-Bration brochure and although this dsp is now retired, you could substitute a pattern from the Color Me irresistible Specialty dsp, found on page142 in the annual catalogue. This lovely paper is amazingly versatile as it can be sponged, spritzed, water coloured or inked in any colour to match your project.

I chose the starry pattern for my cards as this reminded me of fireworks and long nights. I sponged each piece of dsp in either Soft Sky, Pool Party, Pear Pizzazz, Rich Razzleberry or Calypso Coral ink using Stampin sponges. I then stamped the sun image from the Kinda Eclectic stamp set with Crushed Curry ink. Using a piece of kitchen towel I wiped over the inked and stamped dsp to remove the excess ink from the embossed areas, revealing the glossy white stars.

1-DSCF7244

I die cut the 2016 using the Little Numbers Thinlits and Gold or Black Glimmer cardstock and added the HAPPY from the Crazy For You stamp set.

I mounted the dsp onto and added the panel to Thick Whisper White cardstock bases with dimensionals. Inside the card I stamped the happy new year greeting from the Teeny Tiny Sentiments stamp set. I tamped the sun image from the Kinda Eclectic stamp set inside each card and on the envelope as a finishing touch.

New Year cards

New Year cards

I am really happy with the cards, love the colours and a sparkly glimmer paper numbers. Really hope my friends like them. I hope you all have a happy and healthy New Year

Mo x