Cards using the Cake Soiree bundle

Cake Soiree Classes

This month we used the Cake Soiree stamp set and Sweet Cake Builder dies for this month’s classes. I chose this set deliberately because I wanted to showcase the 3 types of embossing – dry, heat and embossing paste, and we had so much fun!!

Let the fun begin!

Sweet silver embossed cake

www.crafty-rootes.com. Cake Soiree Bundle by Stampin’ Up!

The 1st card we made used the lovely Silver Embossing Paste. To begin with we stamped the solid cake in Wisteria Wonder ink onto a scrap of Whisper White cardstock. The stamped cake was laid onto a sheet of plastic and one of the Sweet Soiree Decorative Masks was laid on top. We took a scoop of the Silver Embossing Paste and spread it across the mask in a line layer using the Palette Knives. We lifted the mask off revealing the silver stripes on the cake. This was then set to one side to dry thoroughly and the mask and palette knives were popped into a bowl of warm soapy water then washed at the end of class. Taking the delicate floral cake stamp and Pink Pirouette ink we stamped on the upper left hand corner and lower right hand corner of a Thick Whisper White card front. We also stamped the same image inside the card and on a Whisper White Envelope. We die cut the largest of the Lots of labels dies from Pink Pirouette cardstock and the next size down from Whisper White cardstock. We then trimmed the bottom of both labels and matted them together with Tombow Liquid Adhesive and added a Silver Ribbon bow to the top. When the embossing paste was dry we die cut the cake using the Sweet Cake Builder Dies and added a bow die cut from Silver Foil. The cake was added to the label on Stampin’ Dimensionals.

Pretty floral cake on a cardd cake

www.crafty-rootes.com. Cake Soiree Bundle by Stampin’ Up!

To make the 2nd card we stamped the floral cake in Momento Tuxedo Black ink then coloured it in using Wisteria Wonder, Pink Pirouette, Calypso Coral, Pear Pizzazz, Pool Party & So Saffron inks and Blender Pens. We stamped the smaller of the open roses in Pink Pirouette ink onto a Pink Pirouette card front and rounded the upper right corner with a WRMK’s corner rounder. We dry embossed a strip of Whisper White cardstock using the Sparkle Embossing Folder and the Big Shot. We added a piece of Silver Metallic Ribbon at the top before it was added a strip of Wisteria Wonder cardstock to the left side and glued the whole piece to the left side of the card front. We die cut the gorgeous decorative ‘plate’ from Wisteria Wonder cardstock and added it to the back of the cake with Tombow. Some of the ladies die cut the foliage from Pear Pizzazz cardstock and added it behind the cake which was raised up on Stampin’ Dimensionals.

Gorgeous Silver Embossed Floral cake

www.crafty-rootes.com. Cake Soiree Bundle by Stampin’ Up!

The 3rd card focused on heat embossing. We stamped the floral cake onto a scrap of Pool Party cardstock in Versamark Ink and yes we did remember to use the Embossing Buddy!! We sprinkled the stamped cake with Silver Embossing Powder and heat set it using the Heat Tool. We also stamped the sentiment in Versamark onto a panel of Whisper White cardstock and heat embossed it in the silver. The cake was added to a cake plate and stand die cut from Silver Foil. The cake was then added to the Whisper White panel using Stampin’ Dimensionals. The whole panel was added to a layer of Pink Pirouette cardstock – the same layer that we used to die cut the label for the 1st card. The whole topper was then added to a Wisteria Wonder card base.

I really enjoyed this month’s classes and I know the ladies had a great time.

If you don’t have a Stampin’ Up! Demonstrator I would love to be yours!  If you don’t have a catalogue and live in the UK please let me know and I will be delighted to send you one.  To order any supplies click on the “shop online” button at the top of the page. Alternatively, contact me and I would be happy to place an order for you.

Details of the products I used for this project can be found below. Please visit my blog again soon.

Mo x

Supplies used:
Stamp sets
Cake Soiree
Dies
Sweet Cake Builder & Lots of Labels
Cardstock
Thick Whisper White, Pink Pirouette, Wisteria Wonder, Pool Party, Silver Foil & Whisper White
Ink Pads
Momento Tuxedo Black, Wisteria Wonder, Pink Pirouette, Calypso Coral, Pear Pizzazz, Pool Party, So Saffron & Versamark
Embossing
Silver Embossing Paste, Palette Knives, Silver embossing powder, Sparkle embossing folder, Embossing Buddy, Heat Tool & Sweet Soiree decorative masks
Tools
Big Shot, Paper Trimmer, Stampin Scrub and Stampin Mist, WRMK corner rounder, Blender pens, Paper Piercer, Bone folder and Scissors
Blocks
B, C, D & D
Adhesives
Tombow Liquid Adhesive, Mini Glue Dots & Stampin’ Dimensionals
Accessories
⅛” Silver Metallic Ribbon, Whisper White Envelopes

Stamp-a-Stack event featuring Stampin' Up product

Christmas themed Stamp-a-Stacks

Thank you to the lovely ladies who joined me for my Stamp-a-Stack events in September and October. We had a great time and made so many lovely cards.

All the projects were Christmas themed, in my opinion you can never start too early….. There were 5 tables with 2 cards designs on each table, the ladies made 2 of each card giving them a total of 20 cards.

On arrival each lady was given a bag containing a pack of Merry Little Christmas dsp, 20 card bases in co-ordinating colours – Whisper White, Old Olive and Real Red, a spool of ⅛” Real Red ribbon, 20 Whisper White Envelopes and packets of pre-cut card stock layers to make each card. I prepped the packs for the second Stamp-a-Stack when I was in the grip of a migraine and managed to miss-label some of the packs which caused some hilarity. Luckily I always bring spare cardstock and was able to rectify the mix up with no problems.

Crafty ladies

www.crafty-rootes.co.uk – ladies enjoying a Christmas themed Stamp-a-Stack

As always the day whizzed by so quickly. Here is a picture of some of the ladies hard at work and of some of the projects they made.

Stamp-a-Stack event featuring Stampin' Up product

www.crafty-rootes.com – cards for a Christmas themed Stamp-a-Stack event

Thanks for stopping by my blog today, if you don’t have a Stampin’ Up! Demonstrator I would love to be yours!  If you don’t have a catalogue and you would like one, please let me know and I will send one to you.  To order any supplies click on the “shop online” button at the top of the page. Alternatively, contact me and I would be happy to place an order for you.

Details of the products I used for this project can be found below. Please visit my blog again soon.

Mo x

Supplies used:
Stamp sets
Good Tidings, Carols of Christmas, Feeling Of Christmas, Season Like Christmas, Hearts Come Home
Dies
Card Front Builder framelits, Lots of Labels dies & Hometown framelits
Embossing Folder
Oh My Stars
Cardstock
Thick Whisper White, Whisper White, Real Red, Old Olive & Basic Black
DSP
Merry Little Christmas dsp
Ink Pads and/or Marker
Old Olive, Wild Wasabi, Garden Green, Always Artichoke, Real Red, Cherry Cobbler, Crushed Curry, Sofft Suede, Chocolate Chip, Early Espresso, Basic Grey, Basic Black, Momento Tuxedo Black & Versamark
Tools
Big Shots, Multipurpose Platform + 2 cutting pads, Standard Platform + 2 cutting pads, Heat Guns, Paper Trimmers, Stampin Scrubs and Stampin Mist, Bone folders and Scissors
Acrylic Blocks – multiples
A, B, C, D, E, G & H
Adhesives
Tombow Liquid Adhesive, Mini Glue Dots & Stampin’ Dimensionals
Accessories
Grid Paper, Embossing Buddy, Silver Embossing Powder, ⅛” Real Red Ribbon & Whisper White Envelopes
Gorgeous jewl colours for a good luck card

Banners For You makes a good luck card

I have been using the Banners For You stamp set today to make a good luck card for a friend.

Banners for you in Autumnal colours

www.crafty-rootes.com – Banners For You stamp set by Stampin’ Up!

I started with a piece of Very Vanilla card stock 4 ½” by 3” which I die cut using the Big Shot and the 2nd largest die from the Lots of Labels framelits. I then took 2 of the leaf images from the Banners For You stamp set and the smallest leaf from the Colorful Seasons stamp set and randomly stamped them onto the die cut label using Old Olive, Crushed Curry and Cherry Cobbler inks. To get a depth of colour I used 1st & 2nd generation stamping. To fill in some of the gaps I used the dotty image from the Banners For You stamp set and Pumpkin Pie ink. I die cut a 2nd label in the same size from Crushed Curry cardstock, cut it across the middle with my Paper Trimmer and glued it to the stamped piece using Tombow Liquid Adhesive with the some of the colour showing at the top and the bottom.

pretty Autumnal ggod luck card

www.crafty-rootes.com – Banners For You stamp set by Stampin’ Up!

I ran a panel of Very Vanilla cardstock 5⅜” by 3⅝” through the Big Shot with the Layered Leaves Textured Embossing Folder before adhering the piece to the front of an Old Olive card base.

Gorgeous jewl colours for a good luck card

www.crafty-rootes.com – Banners For You stamp set by Stampin’ Up!

I stamped the banner from the Banners For You Stamp set in Old Olive ink onto a scrap piece of Very Vanilla cardstock and die cut it out using the Bunch of Banners framelits. I then stamped the greeting from the same stamp set in Cherry Cobbler ink onto the die cut banner. I die cut the banner again from a scrap of Old Olive cardstock and glued the 2 together slightly off set. The banner was then added to the stamped label using Stampin’ Dimensionals before the whole piece was added to the card front using Tombow. To finish the card of I added a scattering of Glitter Enamel Dots.

Love the Autumn colours of this card. I hope my friend likes it and that it brings her luck.

Thanks for stopping by my blog today, if you don’t have a Stampin’ Up! Demonstrator I would love to be yours!  If you don’t have a catalogue and you would like one, please let me know and I will send one to you.  To order any supplies click on the “shop online” button at the top of the page. Alternatively, contact me and I would be happy to place an order for you. If you are local please check out my classes and events using the button at the top of the page or leave me a comment.

Details of the products I used for this project can be found below. Please visit my blog again soon.

Mo x

Supplies used:
Stamp sets
Banners for You & Colorful Seasons
Cardstock
Old Olive, Very Vanilla & Crushed Curry
Ink Pads
Old Olive, Crushed Curry, Cherry Cobbler and Pumpkin Pie
Dies
Lots of Labels & Bunch of Banners
Embossing Folder
Layered Leaves
Tools
Big Shot , Stampin’ Trimmer, Stampin Scrub and Stampin Mist, Bone Folder and Scissors
Acrylic Blocks
A, B, B, B, H & H
Adhesives
Tombow Liquid Adhesive & Stampin’ Dimensionals
Accessories
Glitter Enamel Dots, Grid Paper & Very Vanilla Envelope

Star of Light Christmas Class

The November classes featured the gorgeous Star of Wonder stamp set and co-ordinating Starlight Thinlit Dies and non-traditional Christmas colours. I don’t know about you but I get a bit tired of red and green after a while and fancied something a little more modern and decided that Elegant Eggplant, Pool Party, Whisper White and Copper Foil would look amazing.

1-dscf8405The first card involved die cutting the solid star shape from a panel of Whisper White cardstock. This panel was then adhered to the Pool Party cardstock layer which was then added to an Elegant Eggplant card base. We then inset the detailed star die cut from Copper Foil and looking sensational especially when we added a large Basic Rhinestone to the centre. We added a sentiment from the same stamp set using Elegant Eggplant ink and called the card finished.

1-dscf8406For the second card we stamped the fantastic ‘swoosh’ stamp along with the smaller single star onto the Whisper White panel using Versamark Ink covered it with Copper Embossing Powder  then melted it using the Heat Tool and yes I did use the Embossing Buddy before stamping…… go me!  We then added random stars using Pool Party ink. The whole piece was added to a layer of Copper Foil with Tombow glue. This panel was then added to a Pool Party card base. We die cut the solid star from Elegant Eggplant cardstock and topped it with one of the smaller die-cut detailed Copper stars and added a Rhinestone to the centre before adhering it to the front of the card.

Top Tip – we die cut the detailed stars for all three projects from this layer, no one will know once the stamped panel is adhered over the top and it makes the best use of expensive, speciality cardstock.

1-dscf8407The DVD holder was based on a YouTube video by Tracey May – Bedlam and Butterflies –  http://www.youtube.com/watch?v=EWzqbertbQs

We covered a 10¾” square of Whisper White cardstock in randomly stamped  ‘swoosh’s’ in Pool Party ink and the tiny trio of stars in Elegant Eggplant ink. The belly band was made using Elegant Eggplant cardstock with strip of Pool Party Stitched Satin Ribbon along the centre. I took the solid Whisper White star, saved from the first card and added a large detailed star cut from the Pool Party cardstock and topped it with a Copper Foil star and added the whole star to a label die cut from the Lots of Labels Framelit dies and used this to close the belly band as the sides don’t quite meet.

Thank you so much for stopping by my blog today. Hope you like the projects I shared and that you will drop by again soon

Mo x

Supplies used
Star of Light stamp set
Starlight Thinlit Dies
Lots of Labels Framelit Dies
Big Shot + Magnetic Platform and Precision Base Plate
Elegant Eggplant cardstock
Pool Party cardstock
Whisper White cardstock
Copper Foil
Elegant Eggplant ink pad
Pool Party ink pad
Versamark ink pad
Copper Embossing Powder
Embossing Buddy
Stampin Up Heat Tool
Basic Rhinestones
Stampin Scrub and Stampin mist
Stampin Trimmer
Acrylic blocks A, C and E
Scissors
Bone Folder
Paper Piercer
Tombow adhesive
Envelopes

Unused Colour Challenge

So, yesterday I was at my upline Mikaela Titheridge’s (http://thecraftyoinkpen.blogspot.co.uk/) house with fellow team member Susan Merrey (http://craftyduckydoodah.blogspot.co.uk/) and the conversation got around to what are our least used Stampin Up! colours. It turns out we all had 3 or 4 colours that we rarely, if ever use. It is just so easy to reach for your favourite colours and colour combinations when designing a project.

The upshot of the conversation is that Mikaela has challenged the team to name our 4 least used colours and to design a project using at least 3 of them. Got to say I love a challenge…….. so, here goes….

1-DSCF7531

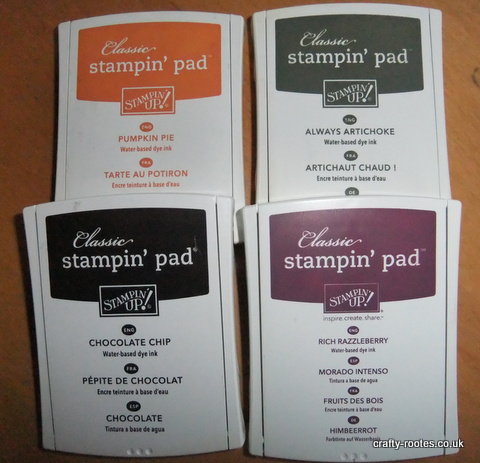
Stampin Up! inkpads

My least used colours are Chocolate Chip (there were cries of horror from Susan when I announced this one), Always Artichoke, Rich Razzleberry, I like the colour but can never seem to combine it successfully with anything else.  And lastly, Pumpkin Pie, I struggle with oranges in general and could just as easily have picked Tangerine Tango or Tangelo Twist, except, I don’t have either of those … says it all really.

My first thought was to use the Gorgeous Grunge stamp set, but on reflection I thought this was a bit of a cop out. I decided I would up the anti by also choosing to use Very Vanilla cardstock and the Happy Patterns stencil pack. I have used both the cardstock and the stencils twice since I bought them and I thought they might work with this colour combo. I also decided to use all 4 of the colours I had selected for the challenge.

1-DSCF7525

I got out some sponge daubers, chose the dotted line stencil pattern and set too. I decided to use a sentiment from the Perfect Pairings stamp set, one of the Sale-A-Bration options which I have not yet used and the Lots of Labels dies, again, I bought these a while ago and haven’t used them. I was so happy with the result; bizarrely the colours seemed to work well together and gave the card quite a masculine look. I added a small amount of the Metallic Gold Thread and some Candy Dots to give the card a bit of texture and called it done.

1-DSCF7526

I decided to try another stencil from the same pack, there are 4 altogether. The sentiment is from Perfect Pairings and I added a small piece of Gold Glitter Tape, another Sale-A-Bration option and used the Banner triple Punch to flag the end of the sentiment.

1-DSCF7528

I have to say, I really like both of the cards and all of the colours I used. What a revelation. I also loved the stencils which were so quick and easy to use.

1-DSCF7529

Hope you like the projects and maybe you could try the challenge for yourself. Let me know how you get on.

Don’t forget Sale-A-Bration ends on the 31St March, so if you would like the Perfect Pairings stamp set or the Glitter tape, or indeed any of the other items go to my online shop at http://www.stampinup.net/esuite/home/crafty-rootes and hit the ‘shop now’ button. You can pick one free item for every £45 you spend.

Looking forward to seeing you again.

Mo x