Abstract Impressions fun fold card

Abstract Impressions for a Double Z Fold card

Today I am sharing a sweet card I made for a friends special birthday using the Abstract Impressions stamp set. I really love this stamp set, it Is so pretty and extremely versatile.

Making the Abstract Impressions card

I started with 2 pieces of Thick Whisper White cardstock, one measuring 11” by 5½”, the other 9¼” by 4¼”. I scored both of these panels on the long sides at 2¾” by 5½”. I rounded some of the corners of the smaller Thick Whisper White panel with the Detailed Trio Punch. I chose 2 patterns from the gorgeous Garden Impressions 6” x 6” dsp, one piece was cut at 5¼” by 5¼” and 2 pieces at 5¼” by 2½” and glued them to the larger piece of Thick Whisper White cardstock.

Abstract Impressions fun fold card

www.crafty-rootes.com – Abstract Impressions for a great double Z fold card

I cut 3 pieces of Mint Macaron cardstock, one at 4⅛” by 3½” and two more at 4⅛” by 2⅝”, rounded the same corners and adhered these to the smaller Thick Whisper White cardstock with Multipurpose Liquid Adhesive. I cut 3 panels of Whisper White cardstock, one at 4” by 4” and the other two at 4” by 2½” and stamped them with images from the Abstract Impressions.

Abstract Impressions fun fold card

www.crafty-rootes.com – Abstract Impressions for a great double Z fold card

I used Mint Macaron ink and Shaded Spruce ink for the leaves and 1st & 2nd generation Powder Pink ink, Calypso Coral ink and Melon Mambo ink for the flowers. I love the depth the multiple layer stamping gives to the flowers.

Abstract Impressions fun fold card

www.crafty-rootes.com – Abstract Impressions for a great double Z fold card

I die cut the numbers 6 & 0, three times each from Mint Macaron cardstock using the sadly retired Large Numbers dies and glued them one on top of the other  using Multipurpose Liquid Adhesive making each number thicker. These were added to the card front with Multipurpose Liquid Adhesive.

The sentiment from the Itty Bitty Greetings stamp set was stamped in Shaded Spruce ink onto a ¼” strip of Whisper White cardstock and cut the ends into flags. I added the sentiment over the numbers with glue. To finish the card I scattered some Faceted Dots.

Abstract Impressions fun fold card

www.crafty-rootes.com – Abstract Impressions for a great double Z fold card

I made an envelope using the Envelope Punch Board and some retired dsp. I hope my friend likes her card.

If you don’t have a Stampin’ Up! Demonstrator I would love to be yours!  If you don’t have a catalogue and live in the UK please let me know and I will be delighted to send you one.  To order any supplies click on the “shop online” button at the top of the page. Alternatively, contact me and I would be happy to place an order for you.

Thanks for visiting my blog today, I love to read what you think of my projects so please do let me know. In line with new Data Protection Legislation (GDPR), by commenting you do so in the knowledge that your name & comment are visible to all who visit this blog and you thereby consent to the use of that personal information for that specific purpose. Please stop by again soon.

Details of the products I used for this project can be found below.

Mo x

Supplies Used


Double Z Fold card

A Special Double Z Fold Card

Today I am sharing a card I made for the 60th birthday of one of my oldest and dearest friends. 4 of us started our nurse training over 40 years ago and have remained firm friends ever since. I seem to gravitate to these double z fold cards for all my special birthdays at the moment but I do love them.

Making a Double Z Fold card

I started with a panel of Thick Whisper White 11” by 5½” and scored it at 2¾” and 5½” on the long side. I then cut another piece of Thick Whisper White 9¼” by 4¼” and scored it at 2¾” and 5½” on the long side.

Double Z Fold card

www.crafty-rootes.com – Double Z Fold card using Stampin Up products

I chose a pattern from the Garden Impressions Designer Series Paper stack (dsp) and cut a piece at 5¼” by 5¼” and a piece at 5¼” by 2½”. I adhered the dsp to the 11” by 5½” scored panel of Thick Whisper White, the larger panel on what will become the back of the card and the smaller panel to the front of the card using Tombow Liquid Adhesive. On this occasion I left the middle panel undecorated.

Double Z Fold card

www,crafty-rootes.com – Double Z Fold card using Stampin Up products

I cut 3 panels of Old Olive cardstock; 1 panel at 4” by 4” and 2 panels at 4” by 2½” and adhered them to the smaller scored Thick Whisper White panel. I then cut 3 panels of Whisper White; 1 panel at 3¾” by 3¾” and 2 panels at 3¾” by 2¼”.  I stamped the gorgeous roses from the Petal Palette stamp set in Momento Tuxedo Black ink along the bottom of the larger Whisper White panel and in the upper right corner of the same panel. I then stamped the roses on either the upper right or lower left of the other two panels and coloured them in using the following Stampin’ Blends – Dark Pink Pirouette (retired), Light Lovely Lipstick, Light & Dark Old Olive. I rounded the corners of the layers using the Detailed Trio Punch.

Double Z Fold card

www.crafty-rootes.com – Double Z Fold card using Stampin Up products

I stamped the ‘Happy’, ‘Birthday’ and ‘th’ in Momento Tuxedo Black ink on the front and second panels. These words came from the, sadly now retired, Number of Years stamp set.  I die cut the 2 number using the also retired Large Number Framelits from Old Olive cardstock. I cut 3 of each and layered them one on top of the other to give added dimension. The numbers were then added to the front panel with Tombow.

Double Z Fold card

www.crafty-rootes.com –
Double Z Fold card using Stampin Up products

The 2 Thick Whisper White pieces were then carefully glued together. To finish the card I made an envelope using my Envelope Punch Board.

Love the colours of this card and I really hope my friend loves it and forgives me for the large ‘60’ on the front!!

If you don’t have a Stampin’ Up! Demonstrator I would love to be yours!  If you don’t have a catalogue and live in the UK please let me know and I will be delighted to send you one.  To order any supplies click on the “shop online” button at the top of the page. Alternatively, contact me and I would be happy to place an order for you.

Thanks for visiting my blog today, I love to read what you think of my projects so please do let me know. In line with new Data Protection Legislation (GDPR), by commenting you do so in the knowledge that your name & comment are visible to all who visit this blog and you thereby consent to the use of that personal information for that specific purpose. Please stop by again soon.

Details of the products I used for this project can be found below. I also used the Number of Years stamp set and Light & Dark Pink Pirouette Blends which have sadly retired. Also the Light Lovely Lipstick Blend which is not yet available for purchase.
Mo x


Special Birthday card using Birthday Blooms and Number of Years by Stampin' Up!

Number of Years and Birthday Blooms for a Special Birthday

Today I am sharing a card I made using the Birthday Blooms stamp set, the Number of Years Stamp set and the Large Numbers dies. These are all retiring from the Annual Catalogue on the 31st of May and I will really miss them. I made this card for my Mum who is celebrating her special birthday in a couple of days.

Making the card

I began with a piece of Thick Whisper White cardstock 11” by 5½” which I scored on the long side at 2¾” by 5½” using my Simply Scored Scoring Tool. I took a 2nd piece of Thick Whisper White cardstock 9¼” by 4¼” and scored it at 2¾” and 5½” on the long side. I then folded and burnished all of the score lines.

Special Birthday card using Birthday Blooms and Number of Years by Stampin' Up!

www.crafty-rootes.com – Birthday Blooms and Number of Years by Stampin’ Up!

I chose 2 patterns from the Tutti-Frutti dsp stack and cut 2 panels at 5⅜” by 2⅝” and one panel at 5⅝” by 5⅝”. I then adhered these to the larger Thick Whisper White panel leaving a tiny border round each panel.

I then cut panels in Lemon Lime Twist cardstockone at 4” by 3½” and two at 4” by 2⅝” and Whisper White panelsone at 3⅞” by 3⅜” and two at 3⅞” by 2⅜”.

Special Birthday card using Birthday Blooms and Number of Years by Stampin' Up!

www.crafty-rootes.com – Birthday Blooms and Number of Years by Stampin’ Up!

On the larger Whisper White panel I stamped the large rose image from the Birthday Blooms stamp set in the lower left hand corner using Momento Tuxedo Black ink. I stamped the smaller rose image in the bottom left or top right on the remaining Whisper White panels. I coloured the flowers in with the Light & Dark Daffodil Delight and the Light and Dark Old Olive Blends Pens.

I stamped the word ‘birthday’ using Momento Tuxedo Black ink on the on the panel with the small bloom in the lower left hand corner. I took some scrap Lemon Lime Twist cardstock and die cut each of the numbers 3 times using my Big Shot and glued them together to give added dimension. I then glued them to the largest stamped Whisper White panel. The word ‘happy’ and ‘th’ were then stamped in Momento Tuxedo Black ink either side of the die cut numbers. I rounded one corner of each of the Whisper White panels and the same corners on the Lemon Lime Twist panels using the new Detailed Trio Punch. These panels were then adhered together with Tombow liquid Adhesive and added to the small Thick Whisper White panel. I then glued the 2 main panels together.

 Special Birthday card using Birthday Blooms and Number of Years by Stampin' Up!

www.crafty-rootes.com – Birthday Blooms and Number of Years by Stampin’ Up!

To finish off I made an envelope using my Envelope Punch Board and the gorgeous Delightful Daisy dsp which will also retire on the 31st May.

I love the bright, sunny colours used on this card. I really hope my Mum likes it.

If you don’t have a Stampin’ Up! Demonstrator I would love to be yours!  If you don’t have a catalogue and live in the UK please let me know and I will be delighted to send you one.  To order any supplies click on the “shop online” button at the top of the page. Alternatively, contact me and I would be happy to place an order for you.

Details of the products I used for this project can be found below. Please visit my blog again soon.

Mo x

Supplies used:
Stamp Sets
Birthday Blooms & Number of Years
Dies
Large Number Dies
Punches
Detailed Trio
Cardstock
Thick Whisper White, Lemon Lime Twist & Whisper White
Designer Series Paper
Tutti-Frutti dsp, Delightful Daisy dsp
Ink Pads
Momento Tuxedo Black
Blends Pens
Light & Dark Daffodil Delight, Light & Dark Old Olive
Tools
Big Shot, Simply Scored Scoring Tool, Paper Trimmer, Envelope Punch Board, Stampin Scrub and Stampin Mist, Bone folder, Paper Piercer and Scissors (Paper Snips)
Blocks
A, B, D, E & G
Adhesives
Tombow Liquid Adhesive
Accessories
Grid Paper & Whisper White Envelopes

Special birthday card using Stampin' Up! product

Perennial Birthday with Large Numbers

Today I am sharing a card I made for one of my team mates who celebrated her special birthday in the week prior to OnStage in Telford – so the partying continued………what can I say!

I chose the large sentiment from the Perennial Birthday stamps set and mounted it onto one of the plates of my Stamparatus Stamp Positioning Tool. I placed a panel of Blushing Bride cardstock 5” by 3¼” onto the platform then inked up the stamp using Blushing Bride ink and stamped multiple times moving  the panel down using the hinge stamping method. I die cut the largest scalloped circle from the Layering Circle dies from the centre of a panel of Chocolate Chip cardstock 5⅛” by 3⅜” and used the remains of the panel to mount the stamped panel and set it aside.

Special birthday card using Stampin' Up! product

www.crafty-rootes.com – Perennial Birthday Stamp set and large Number dies for a special birthday

Taking a panel of Whisper White cardstock approx 3½” by 3½” and my Big Shot I die cut the largest stitched circle from the Stitched Shapes Framelit Dies. I inked up the flower and leaf stamps from the set using Flirty Flamingo, Rich Razzelberry and Wild Wasabi Markers and stamped them onto tthe stitched circle.

Special birthday card using Stampin' Up! product

www.crafty-rootes.com – Perennial Birthday Stamp set and large Number dies for a special birthday

Using the Large Number dies I die cut a 5 and a 0 from Champagne Foil and a further 3 times each from scrap Whisper White cardstock. I glued the die cuts together using Tombow Liquid Adhesive ending with the Champagne Foil on top. I added the numbers to the stitched circle using Tombow and mounted the circle onto the die cut Chocolate Chip scalloped circle.

Special birthday card using Stampin' Up! product

www.crafty-rootes.com – Perennial Birthday Stamp set and large Number dies for a special birthday

Using Tombow Liquid Adhesive I added the stamped circle to the stamped Blushing Bride panel, slightly off set and trimmed off the excess. The whole panel was added to the front of a Blushing Bride card base using Tombow.

Perennial-Birthday-Stamp-set-meets- Large-Number-Dies

www.crafty-rootes.com – Perennial Birthday Stamp set and large Number dies for a special birthday

To finish off I added a scattering of Iridescent Sequins.and stamped the same flower on a panel of Whisper White cardstock 5⅜” by 3⅝” and added it to the inside using Tombow.

Such a pretty card, let me know what you think.

If you don’t have a Stampin’ Up! Demonstrator I would love to be yours!  If you don’t have a catalogue and live in the UK please let me know and I will be delighted to send you one.  To order any supplies click on the “shop online” button at the top of the page. Alternatively, contact me and I would be happy to place an order for you.

Details of the products I used for this project can be found below. Please visit my blog again soon.

Mo x

Supplies used:
Stamp sets
Perennial Birthday
Dies
Stitched Shapes Framelits & Layering Circles
Cardstock
Blushing Bride, Chocolate Chip, Whisper White & Champagne Foil
Ink Pads
Blushing Bride
Markers
Flirty Flamingo, Rich Razzelberry & Wild Wasabi
Tools
Big Shot, Stamparatus Stamp Positioning Tool, Paper Trimmer, Stampin Scrub and Stampin Mist, Bone folder, Paper Piercer and Scissors
Blocks
A, B & C
Adhesives
Tombow Liquid Adhesive
Accessories
Iridescent Sequins, Grid paper, Whisper White Envelope

A special birthday card

Number of Years stamp set and Large Number framelit dies for a big birthday

I have been making a special birthday card this week for my father-in-law using the versatile Number of Years stamp set and the co-ordinating Large Numbers framelit dies. He is 96 tomorrow and looking fantastic.

I started with a piece of Whisper White cardstock 3⅝” by 3” and die cut the 96 from the centre of the panel. I added the die cut numbers to my stash as I planned to use the negative image for the card. I took the panel and stamped the ‘happy’ above the die cut aperture and the ‘birthday’ below the die cut using Tranquil Tide ink. Both words came from the Number of Years stamp set.

Number of Years birthday card

www.crafty-rootes.com – Number of Years stamp set and Large Letter dies by Stampin’ Up!

I took a Thick Whisper White card base and added a piece of Delightful Daisy dsp 4⅛” by 2¾” to the front using Tombow Liquid Adhesive.

Great card for a special birthday

www.crafty-rootes.com – Number of Years stamp set and Large Letter dies by Stampin’ Up!

I added the die cut piece on top of the dsp using Stampin’ Dimensionals. I stamped the ‘th’ in Tranquil Tide cardstock using Tranquil Tide ink, flagged the end using scissors and added it to the card front using Tombow Liquid Adhesive. To finish off I added some of the Silver Metallic Enamel Shapes.

A special birthday card

www.crafty-rootes.com – Number of Years stamp set and Large Letter dies by Stampin’ Up!

I really liked the simplicity of this card. Hope my father in law likes it.

Thanks for stopping by my blog today, if you don’t have a Stampin’ Up! Demonstrator I would love to be yours!  If you don’t have a catalogue and you would like one, please let me know and I will send one to you.  To order any supplies click on the “shop online” button at the top of the page. Alternatively, contact me and I would be happy to place an order for you.

Details of the products I used for this project can be found below. Please visit my blog again soon.

Mo x

Supplies used:
Stamp sets
Number of Years
Dies
Large Number
Cardstock
Thick Whisper White & Whisper White
Designer Series Paper (DSP)
Delightful Daisy
Ink Pads
Tranquil Tide
Tools
Big Shot, Multipurpose Platform + 2 cutting pads, Paper Trimmer, Stampin Scrub and Stampin Mist, Bone folder and Scissors
Acrylic Block
B
Adhesives
Tombow Liquid Adhesive & Stampin’ Dimensionals
Accessories
Metallic Enamel Shapes, Grid Paper & Whisper White Envelope

Bike Ride for a special birthday

Earlier this week a lovely friend celebrated a very special birthday. She loves the outdoors, cycling and walking in particular and although she now has a shiny new bus pass she assures me her bike will still be getting a regular work out. In honour of her bike I chose the Bike Ride stamp set and co-ordinating Build A Bike framelit dies to make her birthday card.

www.crafty-rootes.com – Bike Ride stamp set and Build A Bike framelits

I stamped the frame of the bike using the lovely, rich Fresh Fig ink onto Whisper White card stock and then stamped both the wheels in Archival Basic Gray ink onto Whisper White cardstock before running them through the Big Shot with the co-ordinating Build A Bike dies. Using Tombow Liquid Adhesive I glued the wheels onto the frame to make the bike.

www.crafty-rootes.com – Bike Ride stamp set and Build A Bike framelits

Taking scrap Whisper White cardstock I stamped the open stars from the Balloon Celebration stamp set in Fresh Fig ink before punching out a couple of balloons using the Balloon Bouquet Punch. I stamped the solid stars using Powder Pink ink and punched out another balloon. I stamped some solid balloons in Fresh Fig and Powder Pink ink and punched them out with the same punch.

I stamped the number 6 and 0 from the Number of Years stamp set in Bermuda Bay ink onto more scrap Whisper White ink and die cut them out using the Large Number Dies. I also die cut 3 more sets of the letters from Whisper White cardstock which I adhered to the back of the Bermuda Bay stamped numbers to give added dimension to the numbers.

www.crafty-rootes.com – Bike Ride stamp set and Build A Bike framelits

I decided on a 5½” square card made of Thick Whisper White cardstock and added a 5¼” square layer of Powder Pink cardstock to the front using Tombow Liquid Adhesive. I cut a 5” square piece of Whisper White cardstock and started laying out the bike and balloons to get some idea of placement. I stamped the ‘swoosh’ shape from the Number Years stamp set in Crumb Cake ink along the bottom of the Whisper White cardstock panel and added the bike with Stampin Dimensionals. Using the fine tip of my Basic Black marker and a ruler I added balloon strings to the handle bar and the bar behind the bike seat adding the balloons using Tombow Liquid Adhesive or Stampin Dimensionals. I added the die cut 60 on top of the other balloons and coated the number with Clear Wink of Stella. Finally I coloured the handle bars, seat and pedal of the bike using Crumb Cake ink and a Blender Pen. Such a fun looking card, I really hope my friend likes it.

Thanks for stopping by my blog today, if you don’t have a Stampin’ Up! Demonstrator I would love to be yours!  If you don’t have a catalogue and you would like one, please let me know and I will send one to you.  To order any supplies click on the “shop online” button at the top of the page. Alternatively, contact me and I would be happy to place an order for you. If you are local please check out my classes and events using the button at the top of the page or leave me a comment.

Details of the products I used for this project can be found below. Please visit my blog again soon.

Mo x

Supplies used:
Stamp sets
Bike Ride, Balloon Celebration & Number of Years
Dies
Build A Bike framelits & Large Number Dies
Punches
Balloon Bouquet
Cardstock
Thick Whisper White, Powder Pink & Whisper White
Ink Pads
Momento Tuxedo Black, Fresh Fig, Powder Pink, Crumb Cake & Bermuda Bay + Basic Black Marker pen
Tools
Blender Pen, Stampin’ Trimmer, Stampin Scrub and Stampin Mist, Big Shot, Bone Folder, Paper Piercer and Scissors
Acrylic Block
A, B, C, C & E
Adhesives
Tombow Liquid Adhesive & Stampin’ Dimensionals
Accessories
Clear Wink of Stella, Grid Paper & Whisper White Envelope

Grateful Bunch for a special birthday

This is a card I have made for my Aunt who is celebrating a special birthday this week. I used the gorgeous and sadly retiring Grateful Bunch stamp set as well as the Number of Years stamp set to make a lovely summery looking card.

I wanted a square card so cut the Flirty Flamingo cardstock to 11 inches, scored and folded it at 5½ inches and burnished the fold with my Bone Folder. I cut a piece of Whisper White cardstock to 5 inches square and I stamped the ‘leafy’ image from the Grateful Bunch stamp set using Pear Pizzazz ink twice in the left lower and right upper corners.

www.crafty-rootes.com – Large Number and Grateful Bunch stamp set by Stampin’ Up!

I stamped the numbers from the Number of Years stamp set in Flirty Flamingo ink and die cut them with my Big Shot using the co-ordinating Large Number framelits. I die cut a stitched circle from the  Stitched Shapes dies using Whisper White cardstock and a slightly larger scalloped circle, using the Layering Circles Framelits and Peakaboo Peach cardstock. I then layered them together using Tombow Liquid Adhesive. I stamped the ‘th’ in Pear Pizzazz ink and added the die cut numbers with Stampin’ Dimensionals to the die cut circles. The circle topper was then added to the stamped panel using Tombow Liquid Adhesive, covering the ends of the leafy images.

www.crafty-rootes.com – Large Number and Grateful Bunch by Stampin’ Up! for a special birthday

The Sentiment was stamped in Pear Pizzazz ink. I stamped a variety of medium and small flowers from the Grateful Bunch stamp set in Peakaboo Peach, Flirty Flamingo and Wisteria Wonder on a scrap of Whisper White cardstock before punching them out with the co-ordinating Blossom Bunch Punch. I added the punched flowers in the lower left and upper right hand corner in a random manner before adding an Enamel Shape to each of the flower centres. I scattered some extra enamel shapes on the topper before adhering it to a panel of Peakaboo Peach cardstock.  I decorated a Whisper White panel for the inside of the card using the leaf image and added some punched flowers.

www.crafty-rootes.com – Large Number and Grateful Bunch stamp set by Stampin’ Up!

I made an envelope for the card using a sheet of Flirty Flamingo dsp from the In-Color paper stack using the Envelope Punch Board adhering it with Fast Fuse Adhesive.

Such a pretty card. I really hope my Aunt likes it.

Thanks for stopping by my blog today, if you don’t have a Stampin’ Up! Demonstrator I would love to be yours!  If you don’t have a catalogue and you would like one, please let me know and I will send one to you.  To order any supplies click on the “shop online” button at the top of the page. Alternatively, contact me and I would be happy to place an order for you.

Details of the products I used for this project can be found below. Please visit my blog again soon.

Mo x

Supplies used:
Stamp sets
Grateful Bunch & Number of Years
Dies
Large Number Framelits , Layering Circles  & Stitched Shapes Framelits
Punches
Blossom Bunch
Cardstock
Flirty Flamingo, Peakaboo Peach & Whisper White
DSP
In-Color Paper Stack
Ink Pads
Flirty Flamingo, Peakaboo peach, Pear Pizazz & Wisteria Wonder
Tools
Big Shot, Multipurpose Platform + 2 cutting pads, Paper Trimmer, Envelope Punch Board, Stampin Scrub and Stampin Mist, Bone folder and Scissors
Acrylic Block
A, B, B, C & D
Adhesives
Tombow Liquid Adhesive, Fast Fuse & Stampin’ Dimensionals
Accessories
Subtle & In-Color Enamel Shapes

Large Number Dies meets Botanical Blooms

It was a beautiful, crisp sunny day when I created a 50th Wedding Anniversary card for my Aunt and Uncle who celebrated over the weekend.

I cut the 50 from Gold Foil Paper using the Large Number Framelit Dies and added it to a 3” by 3” square of Whisper White cardstock. I rounded the top right corner with the Project Life Corner Rounder and added the Whisper White layer to a 3¼” by 3¼” to a panel of Cherry Cobbler with the top right hand corner also rounded.

www.crafty-rootes.com – Stampin’ Up! Large Number Dies and Botanical Builder dies

I couldn’t find any designer Series Paper (dsp0 I liked and ended up using a piece of retired Winter Wonderland dsp 5½” by 5½”. Love these thick gold stripes which give a really luxurious feel to the card. I added the topper piece I had created, with Stampin’ Dimensionals to the top right hand side of the dsp panel which I had adhered directly to the Whisper White card base using Tombow Liquid Adhesive.

www.crafty-rootes.com – Stampin’ Up! Botanical Builder dies and Large Number dies

I then die cut some of the flowers and leaves using the Big Shot and the Botanical Builders dies in Cherry Cobbler, Gold Foil and Chocolate Chip cardstock and layered them to give some added dimension and interest. I added them using Stampin’ Dimensionals and Mini Glue Dots around the bottom left hand corner of the topper. They looked lovely, very elegant.  I finished them off by adding White Perfect Accents to each of the flower centres.

www.crafty-rootes.com – Stampin’ Up! Large Number dies and Botanical Builder dies

The sentiment from the One Wild Ride stamp set was stamped in Cherry Cobbler ink then  hand trimmed out and added with Stampin’ Dimensionals. At the last minute I added a small Vellum butterfly punched out using the Bitty Butterfly punch and decorated it with a Cherry Cobbler Enamel Accent. I made an envelope using some retired Cherry Cobbler dsp and my Envelope Punch Board.


Thanks for stopping by my blog today, if you don’t have a Stampin’ Up! Demonstrator I would love to be yours!  If you don’t have a catalogue and you would like one, please let me know and I will send one to you.  To order any supplies click on the “shop online” button at the top of the page. Alternatively, contact me and I would be happy to place an order for you.

Details of the products I used for this project can be found below. Please visit my blog again soon.

Mo x

Supplies used:
Stamp sets
One Wild Ride
Dies
Large Number Dies & Botanical Builder dies
Cardstock
Thick Whisper White, Whisper White, Cherry Cobbler, Chocolate Chip and Gold Foil
Designer Series Paper
Winter Wonderland (retired) & Envelope Paper
Ink Pads
Cherry Cobbler
Punches
Bitty Butterfly Punch, & Project Life Corner Rounder
Tools
Paper Trimmer, Stampin Scrub and Stampin Mist, Big Shot + Magnetic Platform,  Envelope Punch Board, Bone folder, Paper Piercer and Scissors
Acrylic Block
H
Adhesives
Tombow Mono Multi Liquid, Stampin’ Dimensionals & Mini Glue Dots
Sundries
White Perfect Accents & Enamel Shapes

Watercolor Masculine Birthday

Today I am sharing a card I made recently for the husband of my upline, Mikaela. Rumour had it; a big birthday was coming up……

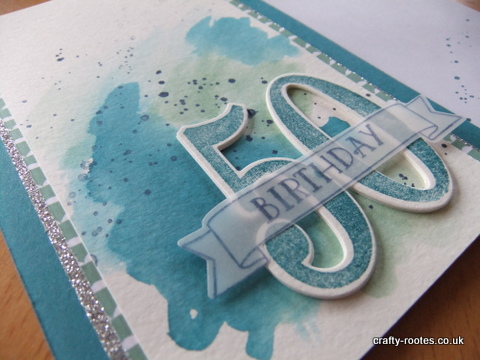
Like many people I find masculine cards a bit of a challenge, but after seeing some lovely ideas on Pinterest, I dug out my water colour cardstock and my aquapainter and got to work. I haven’t water coloured for a while but I have seen some lovely ideas on Pinterest that I wanted to try out.

crafty-rootes.co.uk - Stampin Up Number of Years, masculine water colored card

crafty-rootes.co.uk – Stampin Up Number of Years, masculine water colored card

I chose to use Island Indigo and Mint Macaron inkpads, a bit of a go to colour combo of mine at the moment, they go so well together. I squeezed the inkpads to get ink in the lid and used that to messily watercolor the bottom ⅔rds of the cardstock. I wanted an area of darker colour fading out towards the top of the cardstock. When I was happy, I left it to dry.

crafty-rootes.co.uk - Stampin Up Number of Years, water color, masculine card

crafty-rootes.co.uk – Stampin Up Number of Years, water color, masculine card

I wanted a little more texture so added some speckles using the Gorgeous Grunge stamp set. I stamped 1st, 2nd and 3rd generation using Night of Navy ink.

crafty-rootes.co.uk - Stampin Up Number of Years, water color, masculine card

crafty-rootes.co.uk – Stampin Up Number of Years, water color, masculine card

I stamped the 50 from the Number of Years stamp set using Island Indigo ink and die cut the numbers using the co-ordinating Large Number dies. To give extra dimension, I die cut both numbers 3 more times and adhered them together to give a raised, chipboard effect. I stamped the little banner from the Number of Years stamp set onto Vellum cardstock using Night of Navy ink and added the birthday sentiment from the same stamp set using the same ink.

I added a strip of patterned paper from the gorgeous, and sadly retiring, Birthday Bouquet Dsp pack to each side of the watercoloured panel. I added a strip of Silver Glimmer card to either side and mounted the whole panel to a card base of Island Indigo using dimensionals.

I was really happy with how this card turned out, and so was the recipient. It turned out that he was a few years older than 50…..I had managed to get my wires crossed. Still my card had a front of shelf position ……. happy days…..

Thank you for stopping by. Hope to see you again soon.

Mo x

Celebrate Today for a Special Birthday

On this wet and very windy day I abandoned plans to go out for a walk and stayed inside to craft…. I know, any excuse……

So, having made a special birthday card for my mother to give her sister in law, see post (Number of Years) I decided to make my own 70th birthday for her.

I looked through my stamp sets for inspiration and was attracted by the set, Celebrate Today. I used this set a lot when it first came out but haven’t used it for a while. I thought it might make a fab special birthday card.

1-DSCF7465

Stampin Up! Celebrate Today and Number of Years

I used a panel of Whisper White and stamped along the edge with the spotty stamp using Pink Pirouette ink. This stamp is designed to add spots to the balloons, but thinking outside the box, it made a great border. I stamped the solid balloon in Pool Party ink using a Stampin Pierce Mat under the cardstock; I find this gives me a better stamped image when using a Photopolymer set. I love the sentiment on the balloon string from the Balloon Celebration stamp set and stamped it in Rose Red.  The Happy Birthday was stamped using the Rose Red and Pool Party ink.

I love the Tombow Multipurpose Glue and used it to adhere a strip of the gorgeous Pool Party Glitter Ribbon to the left side of the stamped panel. I decided to round the upper right corner of the stamped panel and the piece of Silver Foil cardstock I used as a mat, before adhering them together leaving a small border.

I then stamped the numbers from the Number of Years stamp set using Rose Red ink onto a scrap Whisper White cardstock and die cut them using the BigShot and the Large Number dies.

My Aunt is a lover of pink and I used a card base of Rose Red. I rounded the upper right corner, mimicking the stamped panel and mounted the panel using Dimensionals. I decided to tilt the stamped panel on the card front for a more modern look. I finished by adding the die cut numbers onto the balloon with dimensionals and adding some co-ordinating candy dots.

I absolutely love this card and will be using this set again for some other special occasion cards I need to make, so watch this space…….

Don’t forget Sale-A-Bration ends on the 31St March, so check out my online shop at http://www.stampinup.net/esuite/home/crafty-rootes and hit the ‘shop now’ button. You can pick one free item for every £45 you spend, don’t miss out.

Looking forward to seeing you again.

Mo x